My bike is up for sale!
It has been great owning this beast, but sadly, I need to let go as times aren’t great for me!
Do help me spread the news!
Yamaha Tracer MT-09 Fj-09 900 Mods, farkles, review
My bike is up for sale!
It has been great owning this beast, but sadly, I need to let go as times aren’t great for me!
Do help me spread the news!
Did some research and decided not to go for the common fuse/relay module in the market.
Ended up with littelfuse’s PDM system to approach the electrical.
I got the HWB18 and parts from mouser.sg, shipped free. Cost me approximately $65.00 a set without fuse. The HWB18 is still not as compact as I hoped for but the quality is definitely well built.
The idea for this PDM will power BLUESEAmy after market horns and LED spot lights. I will leave a circuit open for probably external power since my current USB socket that is tapping from the power socket is not supplying enough current to my iPhone 6+. I also want to use this lead for its original intent to power the BLUESEA’s 1045 fast charge 4.8A USB socket.
Anyway, I would still need to plan out how to run the wiring neatly and also purchase the correct sheathing. Stay tune.


This is probably the most practical case I bought so far. It is a Pelican 1150 approximately 3L volume box fitted with tank ring and a dial combi-lock. I choose this over a tank bag because it is waterproof and a secure solution than fabric tank bag that I can leave it on the bike. I added an additional duo USB charging ports to the handle bar to provide power to my accessories.
With this, it resolves my charging solution too. Yes, the tank bag does just fine, but leaving it on the bike does not feel secure.
I use this to hold all the little dingles such as passports, loose changes, sun glasses, a battery bank, my ipad mini. While riding, the battery bank is being charged along with whatever device that requires juice. And when I still require charging, I can lug along the device with the battery bank. I also use the battery bank to recharge my intercom after rides.


I tested them under the rain, so far, all is well except my iPhone 6+ went dead. haha. I didn’t keep it into the box and gamble through the rain, I lost. The rest of my accessories stay dry.
Had these bags installed this week!
They do stick out about 2″ off my Evo bars, but no biggie. They did affect my rebound setting and even out the preload of my shock when load up. Since my experience with cases, commuting with these side cases are all about getting used to. I am happy with them, as they fits full face helmet and functions well!
I like Shad system since they stick out lesser than Givi’s,e though less well made.
But they are more affordable so this is the ticket!
Let me hear your questions!


Got my 2nd mirror extenders. These are good across all Yamaha detachable type mirrors. Compared these to the Chinese types, these are neater and cost much lesser than Koubalink’s.
They help increase visibility and widen the rear angle way better than OEM’s short position. This does not replace checking blind spot, you must check your blindspot at all times. It does increase comfort and line of sight. Must have!
Link for you if you wish to get it
When I got the bike, it came installed with an SW Motech bar back riser, which alters the steering awfully and pushing me far back. I quickly removed it and kept it stock. I went on to search for new handle bars and compared it online. I choose the Answer Pro Taper Evo bend as this bar raise the height, having similar sweep and pull back to stock bars.
After adjusting the new handlebar, I should say they are brilliant! It is more comfortable and less attack stance, which was my objective for easy U-turns and a bit more neutral handling. I sure misses the sporty feel from the stock handlebar, but the Evo is much better for touring.


I had been missing for a few months due to health issues. But I am back up and will keep this journal going on!
Here are some things I done recently and riding plans
Changed oil & coolant, swapped handlebar, purchase an auxiliary switch, decided on panniers and ordered mirror extenders
Stay tuned!
In my previous post, I mentioned about getting the Yamaha Bolt XVS950 Actuator, and it arrived. The MT-03, R25 will also fit for the Tracer, and they are the longest Actuator so far.
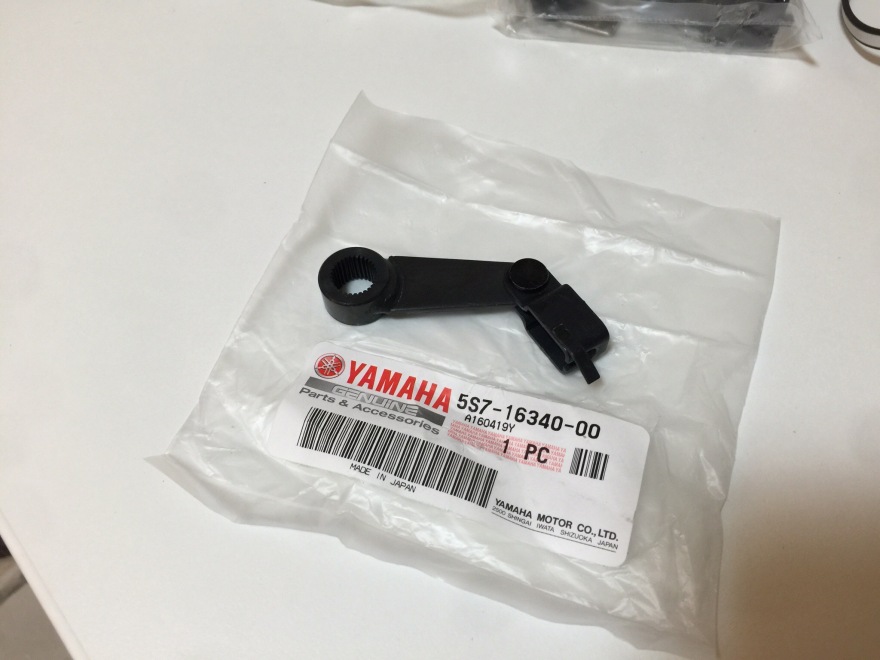
But before assembly, here are some physical fundamental on leveraging – Longer distance = lesser force, vice versa.
This mod is a preference mod and if you are after the lightest pull, the tallest order to least as follows:
1) Do the XSR900 clutch assembly swap, Yamaha claims this reduce 20% clutch effort
2) Actuator Swap, pros & cons depends on your needs and requirements
3) Clutch Assembly Swap – to compliment 2)
Do understand that having a lighter pull through means of changing the actuator leverage ratio. what it means is that it requires you to pull a longer distance over the original assembly. Setting the Tracer’s actuator as baseline, any longer actuator fitted will result in a longer pull distance to disengage the clutch plates. There is no best length to please all.
Here are the Center to Center measurements:


I simply chose Bolt’s because of:
1) it is black
2) I do not need a “slow” pull
3) because MT-03’s actuator is not black
The helmet locks have arrived.
Definitely responsibly engineered. I am gald I did not choose this assembly through faith and hope they fit all Yamaha, and ordered through direct part numbers when the cost difference for certainty is just SG82¢(as of the day of my order). Of course we need to factor in additional cost to match the Ignition key to the helmet lock, though this is optional to match the wafers in the tumbler to have a (almost in my case) single key solution. I definitely will go for it (when I eventually order the candy red FJR cases)
The helmet hanger is a generic part but the key difference is definitely the hanger’s bracket.


After watching Two Wheel Obsession’s FJR1300 clutch upgrade, it come across to me that the Tracer deserve the upgrade too, to spare my ginger fingers heh.
What are the benefits of Yamaha’s Assist & Slipper Clutch introduced in 2012?
Watch:
So, here are your spot the difference between XSR 900 vs Tracer’s Clutch parts
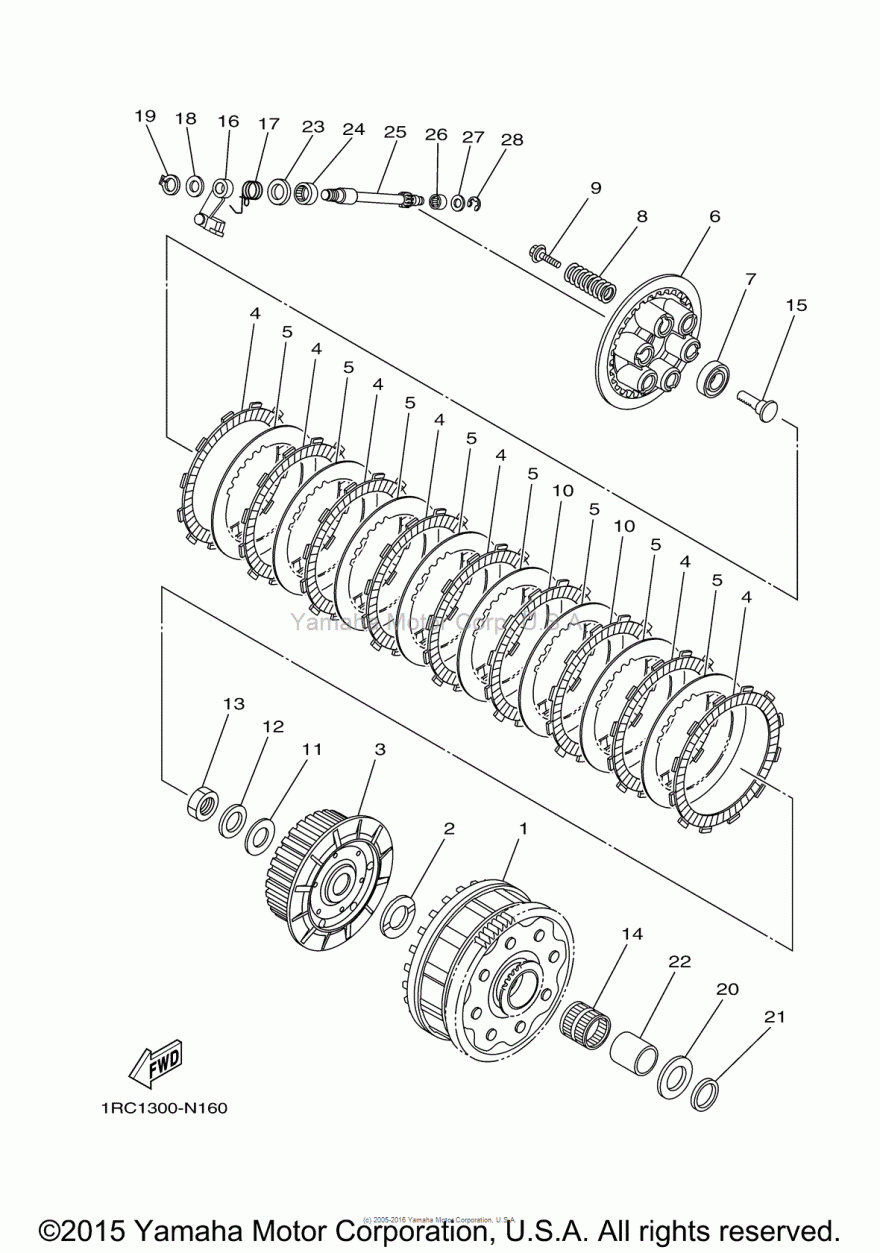
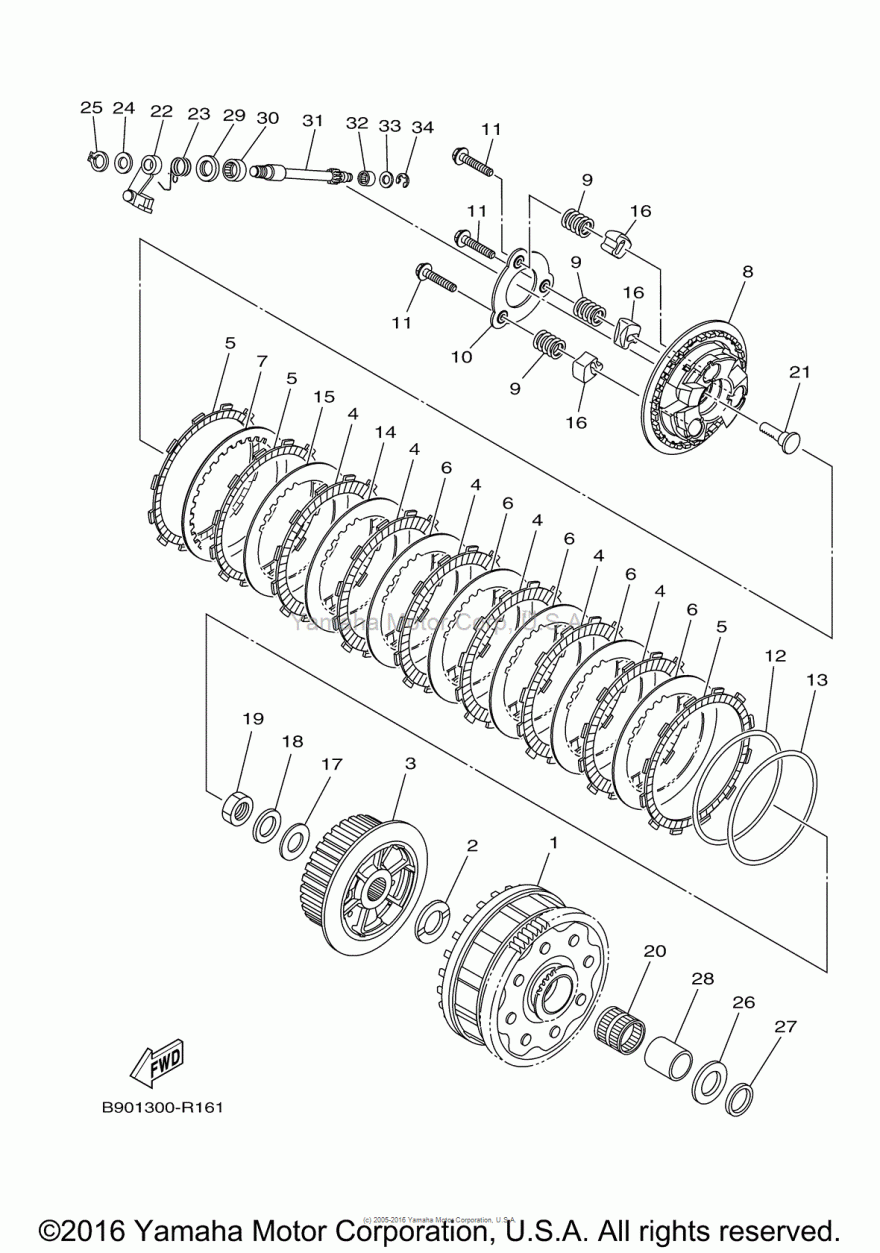
This is definitely going to work if you study the assembly in detail and order the respective parts as according to the part numbers difference (less first 3 digit as it represents the model).
It will come after my plates are giving way. Meanwhile I will work on the clutch arm & Versys clutch assembly swap.
